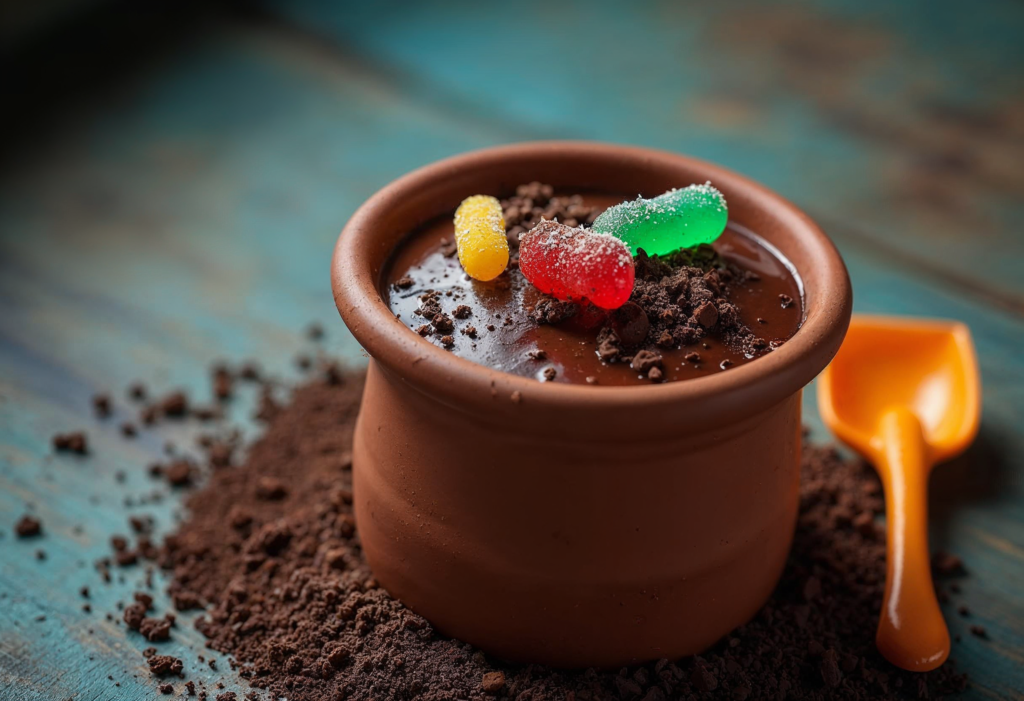
What Is Worms in Dirt?
“Worms in Dirt” is a fun and creative dessert that combines chocolate pudding, crushed cookies, and gummy worms to create a treat that looks like a miniature garden bed. Loved for its unique appearance and sweet taste, this dessert often evokes giggles and curiosity, especially among kids. The “dirt” is made from crushed chocolate cookies, and the “worms” are gummy candies strategically placed to look like they’re crawling through the dessert. Despite its playful appearance, the recipe is versatile and can be customized for various dietary preferences.
Why It’s a Favorite Dessert for Kids and Adults Alike
This no-bake dessert is not only visually appealing but also deliciously easy to make. Children love its whimsical presentation, while adults appreciate its nostalgic charm and the simplicity of the preparation. It’s the perfect choice for birthday parties, Halloween gatherings, or any event where fun and creativity take center stage. The combination of creamy pudding, crunchy cookies, and chewy gummy worms creates a satisfying blend of textures, making it a crowd-pleaser for all ages.
This dessert is more than just visually entertaining—it’s also versatile and customizable. With its easy preparation and kid-friendly appeal, it can quickly become a favorite for many occasions. If you enjoy exploring creative recipes like this one, you might also like our Zucchini Cake Recipe, which brings a unique twist to traditional baking.
Ingredients for Worms in Dirt Recipe
Essential Ingredients
To create a classic “Worms in Dirt” dessert, you’ll need the following ingredients:
- Chocolate Pudding
- Use either store-bought pudding cups or make your own from a pudding mix or scratch. Approximately 4 cups of pudding are required for a standard recipe.
- Chocolate Sandwich Cookies
- The most popular choice is Oreo cookies, but any chocolate sandwich cookie will work. About 20 cookies are needed to create enough “dirt.”
- Gummy Worms
- These are the stars of the show! Choose colorful gummy worms that are soft and stretchy. Around 1-2 cups of gummy worms will suffice, depending on how many layers or decorations you want.
Optional Add-Ons for Extra Fun
If you want to elevate your dessert, consider these optional ingredients:
- Whipped Cream
- For added creaminess, fold whipped cream into the pudding or use it as a decorative topping.
- Candy Decorations
- Include edible flowers, chocolate rocks, or candy bugs for a garden-like appearance.
- Food Coloring
- Add green-tinted shredded coconut to mimic grass or sprinkles for added flair.
- Layers and Mix-ins
- Incorporate layers like brownie chunks or cake crumbs for more texture.
- Serving Vessels
- Mini terracotta pots, mason jars, or clear plastic cups add a touch of creativity to the presentation.
For other creative no-bake ideas, check out our Yogurt Bark Recipe, a healthy yet indulgent treat perfect for any occasion.
Step-by-Step Instructions
1. Preparation of the Pudding Base
Start by preparing the pudding base. This can be done in two ways:
- Using Store-Bought Pudding Cups:
Purchase ready-made chocolate pudding cups to save time. Simply peel off the lids, and you’re ready to go. - Making Pudding from Mix:
- Follow the instructions on a chocolate pudding mix packet. Usually, this involves combining the mix with milk and whisking until it thickens.
- Let the pudding chill in the refrigerator for about 30 minutes to set properly.
- Homemade Chocolate Pudding:
For a richer and more indulgent base, make chocolate pudding from scratch using milk, sugar, cocoa powder, cornstarch, and vanilla extract. Cook the mixture on the stove until thickened, then cool completely.
2. Crushing the Cookies for the “Dirt”
The crushed cookies are essential for creating the “dirt” effect. Here’s how to prepare them:
- Separate the Cream Filling (Optional):
If you prefer finer crumbs, scrape out the cream filling from chocolate sandwich cookies before crushing. - Crush the Cookies:
- Place the cookies in a zip-top bag. Seal it, leaving a small air gap to prevent bursting.
- Use a rolling pin to crush the cookies into fine crumbs. Alternatively, pulse them in a food processor for an even consistency.
- The result should resemble loose soil.
3. Arranging the Worms and Layers
Assembling the “Worms in Dirt” dessert is where the fun begins!
- Choose a Serving Container:
Use clear cups, mini terracotta pots (lined with parchment paper), or a large glass bowl to show off the layers. - Layer the Ingredients:
- First Layer: Add a layer of chocolate pudding at the bottom of the container. Spread it evenly with a spoon.
- Second Layer: Sprinkle a generous layer of crushed cookies over the pudding.
- Third Layer: Add a few gummy worms on top of the “dirt.” Let some of the worms hang over the edges for added effect.
- Repeat the Layers:
Continue layering pudding, cookie crumbs, and gummy worms until the container is filled. Finish with a thick layer of crushed cookies on top to resemble a fresh garden bed. - Decorate:
- Arrange gummy worms crawling out of the “soil.”
- Add candy rocks or edible flowers for extra flair.
- Chill Before Serving:
Refrigerate the dessert for at least 1 hour to let the layers set and the flavors meld together.

Creative Presentation Ideas
Unique Containers and Themes
The way you present “Worms in Dirt” can make it even more exciting. Here are some creative ideas:
- Mini Terracotta Pots
- Line small terracotta pots with parchment paper or food-safe liners.
- Serve individual portions in these pots, making it look like an actual potted plant.
- Mason Jars
- Layer the pudding and crushed cookies in mason jars for a rustic, farm-like aesthetic. The transparent sides beautifully showcase the layers.
- Clear Plastic Cups
- Use clear cups for individual servings, allowing guests to see the “dirt” and worms clearly. Great for kids’ parties or school events.
- Garden Theme
- Arrange the dessert in a large dish decorated with small toy shovels, candy rocks, or edible flower toppers for a garden bed effect.
- Halloween Theme
- Add creepy elements like gummy spiders, candy skeletons, or edible gravestones (made from cookies or fondant) for a spooky twist.
Consider pairing this dessert with a fun drink like the Caramel Brulée Latte to elevate your themed gathering.
Adding Edible Decorations
Take your presentation up a notch with these edible decorations:
- Edible Flowers
- Top the dessert with edible flowers like violets or pansies for a garden-fresh look.
- Candy Rocks
- Sprinkle candy rocks over the top layer of “dirt” to mimic pebbles.
- Shredded Coconut Grass
- Tint shredded coconut with green food coloring to create grass. Scatter it over the top for a realistic outdoor vibe.
- Fondant Decorations
- Create small garden tools, worms, or bugs out of fondant to enhance the theme.
- Chocolate Toppers
- Use chocolate shavings or mini chocolate bars as additional decoration on the “dirt.”
Serving Presentation Tips
- Serve with Mini Shovels or Spoons: Use mini toy shovels as spoons for added fun and thematic consistency.
- Label the Dessert: Create quirky labels like “Freshly Dug Soil” or “Worm Farm Delight” to add humor and context.
- Add a Surprise Element: Insert a hidden layer of brightly colored gummy candies or marshmallows in the middle of the dessert for an unexpected pop of fun.
Tips for Perfect Worms in Dirt Dessert
Maintaining the Right Consistency
- Pudding Texture
- Ensure the pudding is thick and creamy. If it’s too runny, the layers will blend together, and the “dirt” will sink. Allow pudding made from scratch or mix to chill thoroughly before assembling.
- Cookie Crumbs
- Crush the cookies finely to create a smooth “soil” layer. Larger chunks can be used sparingly to add texture, but they should not dominate.
- Layering Technique
- Use a spoon or spatula to evenly spread each layer of pudding and crumbs. Uneven layers can cause the dessert to tilt or lose its visual appeal.
For a similarly customizable recipe, explore our Yogurt Muffin Recipe, which offers endless flavor combinations.
Substitutions for Dietary Restrictions
- Gluten-Free Option
- Replace regular chocolate sandwich cookies with gluten-free versions.
- Use certified gluten-free pudding mix or make pudding from scratch using gluten-free ingredients.
- Dairy-Free or Vegan Option
- Opt for plant-based milk like almond, oat, or coconut milk when making the pudding.
- Use vegan chocolate cookies and gummy worms (check for gelatin-free options).
- Low-Sugar or Keto-Friendly Version
- Use sugar-free pudding mix and sugar-free chocolate cookies.
- Substitute regular gummy worms with sugar-free or keto-friendly alternatives.

Storage Tips
- Refrigeration
- Always store the dessert in the refrigerator until serving. This keeps the pudding firm and prevents the gummy worms from melting.
- Prepping Ahead of Time
- Prepare the pudding and cookie crumbs a day ahead, but assemble the layers closer to serving time to maintain the freshness of the “dirt” and worms.
- Shelf Life
- “Worms in Dirt” can be stored in the fridge for up to 3 days, though the cookie crumbs may soften over time. For best results, consume within 24 hours.
For more intricate layer ideas, explore our Ultimate Guide to Weeknight Dinner Recipes, which includes other layered dishes to try at home.
Troubleshooting Common Issues
- Pudding Too Runny
- If the pudding hasn’t set, try whisking in a bit more instant pudding mix or chilling it for longer.
- Crumbs Too Chunky
- Recrush the cookie crumbs or sift them through a strainer to achieve the desired consistency.
- Layers Mixing Together
- Chill each layer briefly before adding the next to ensure stability.
Fun Variations of Worms in Dirt
Chocolate vs. Vanilla Options
While the classic “Worms in Dirt” dessert uses chocolate pudding to mimic soil, you can get creative with other pudding flavors for variety:
- Vanilla Pudding
- Use vanilla pudding for a lighter look and pair it with crushed vanilla cookies or graham crackers for a sandy effect.
- Add gummy fish instead of worms for a “beach” or “aquarium” theme.
- Layered Pudding Flavors
- Alternate layers of chocolate and vanilla pudding to create a visually appealing dessert.
- Add a surprise pop of color with strawberry or butterscotch pudding.
- Dark Chocolate Pudding
- For a richer flavor, use dark chocolate pudding, which creates a more realistic soil look.
Adding Layers Like Cake Crumbs or Gummy Bugs
- Cake Crumbs
- Incorporate layers of chocolate cake crumbs for added texture and depth. This works especially well in larger serving dishes like trifle bowls.
- Brownie Chunks
- Add chunks of fudge brownie between the pudding and crumbs for a decadent twist.
- Gummy Bugs or Critters
- Replace or complement gummy worms with gummy spiders, beetles, or ants for a more adventurous take.
- Fruity Layers
- Include a layer of chopped fruit like strawberries, raspberries, or bananas for a fresh and tangy contrast to the sweetness.
Themed Variations for Special Occasions
- Halloween Graveyard
- Add cookie “tombstones” made by writing on flat cookies with icing.
- Scatter candy bones or small plastic Halloween decorations (food-safe) to enhance the spooky vibe.
- Garden Theme
- Add layers of green-tinted coconut to mimic grass.
- Use flower-shaped candies or fondant blooms to create a charming garden look.
- Birthday Party Surprise
- Insert hidden layers of colorful sprinkles or confetti candy for a surprise when guests dig into the dessert.
- Personalize the dessert with edible name tags or themed toppers.
- Holiday Variations
- For Christmas, use white chocolate pudding, crushed peppermint cookies, and red-and-green gummy worms.
- For Easter, create “muddy nests” using chocolate pudding and crushed cookies, then top with mini chocolate eggs and marshmallow bunnies.
Healthier Versions
- Fruit-Based Worms in Dirt
- Replace gummy worms with strips of fresh fruit, such as apple peel or thinly sliced strawberries, for a healthier take.
- Use unsweetened pudding or Greek yogurt for the base.
- Protein-Packed Dessert
- Swap traditional pudding with a protein pudding mix or low-fat Greek yogurt mixed with cocoa powder and honey.
With these fun twists, “Worms in Dirt” can be adapted for any occasion, taste, or dietary need, making it a versatile and delightful treat for all!
Serving Suggestions and Occasions
Ideal Events for Serving Worms in Dirt
- Birthday Parties
- “Worms in Dirt” is a hit at kids’ birthday parties due to its playful presentation. You can customize it with the birthday child’s favorite flavors or themes.
- Halloween Gatherings
- The creepy, crawly appearance of gummy worms makes this dessert perfect for Halloween. Decorate with candy tombstones or edible skeleton parts for an extra spooky touch.
- School Events and Picnics
- Individual servings in clear cups make this dessert easy to transport and share at school celebrations, bake sales, or outdoor picnics.
- Themed Parties
- A garden-themed tea party or a bug-themed event for kids is an excellent opportunity to serve this dessert in fun containers like mini terracotta pots or flower pots.
- Holiday Celebrations
- Adapt the recipe for holidays like Easter (add candy eggs), Christmas (use red-and-green gummy worms), or summer BBQs (serve in large tubs with edible shovels).
Portion Sizes for Kids and Adults
- Kids
- For younger guests, serve smaller portions in clear plastic cups or mini pots. A 4-oz serving is usually sufficient for kids under 10 years old.
- Adults
- For older guests or larger appetites, use larger cups or bowls. Adding sophisticated elements like dark chocolate shavings or a hint of espresso in the pudding can make it more appealing to adults.
- Family-Style Serving
- Use a large trifle bowl or glass dish for family-style serving. Provide a large spoon so guests can serve themselves, making it a centerpiece dessert.
Serving Accessories
- Miniature Shovels
- Replace traditional spoons with miniature toy shovels to enhance the fun. These are especially popular for garden-themed presentations.
- Decorative Table Setups
- Surround the dessert with props like toy insects, tiny gardening tools, or flower decorations to set the stage for the dessert.
- Layered Visuals
- Use clear containers to showcase the layers of pudding, cookie crumbs, and worms, making the dessert visually enticing before guests even dig in.
Serving Tips for Special Events
- Interactive Dessert Bars
- Set up a “Worms in Dirt” dessert bar where guests can assemble their own creations. Provide bowls of pudding, crushed cookies, gummy worms, and various toppings to let them customize.
- Frozen Version
- Turn this dessert into a frozen treat by layering the ingredients in popsicle molds and freezing them. Perfect for summer events!
- Gift-Worthy Desserts
- Prepare individual servings in mason jars, tie them with decorative ribbons, and gift them as party favors or take-home treats.
FAQs about Worms in Dirt Recipe
1. Can It Be Made Ahead of Time?
Yes! “Worms in Dirt” is an excellent make-ahead dessert. Here are some tips:
- Prepare the Layers Separately: Make the pudding and cookie crumbs in advance. Store the pudding in an airtight container in the refrigerator and keep the crumbs in a sealed bag at room temperature.
- Assemble Closer to Serving Time: Layer the dessert 1-2 hours before serving to prevent the cookie crumbs from getting soggy.
2. How Long Does It Last in the Fridge?
When stored properly, “Worms in Dirt” can last up to 3 days in the refrigerator. However, the cookie crumbs may lose their crunch over time.
- Pro Tip: If you’re serving leftovers, add a fresh layer of crushed cookies on top before serving to restore the texture.
3. Can I Substitute Homemade Pudding for Store-Bought?
Absolutely! Homemade pudding adds a richer, creamier texture to the dessert.
- How to Make Homemade Chocolate Pudding: Combine milk, sugar, cocoa powder, cornstarch, and vanilla extract in a saucepan. Cook over medium heat until thickened, then chill before using.
- Using homemade pudding allows you to control the sweetness and quality of ingredients.
4. What Are Some Gluten-Free Options?
You can easily adapt this recipe for a gluten-free diet:
- Cookies: Use gluten-free chocolate cookies or brownies. Many brands offer gluten-free sandwich cookies that work perfectly for the “dirt” layer.
- Pudding: Opt for a gluten-free pudding mix or make pudding from scratch using gluten-free cornstarch.
- Ensure that any toppings or decorations, like gummy worms, are labeled gluten-free.
5. Can I Use Other Types of Candy Besides Gummy Worms?
Yes! You can use various candies to fit the theme or personal preference:
- Candy Bugs: Gummy spiders, ants, or beetles can add a creepy-crawly touch, especially for Halloween.
- Marshmallow Shapes: Use small marshmallow shapes, such as bunnies or flowers, for a garden-themed dessert.
- Chocolate Candies: Mini chocolate eggs, candy rocks, or chocolate chips add flavor and texture.
6. Can I Freeze Worms in Dirt?
Freezing isn’t recommended for the assembled dessert because the pudding may separate and the gummy worms will harden. However:
- Freezing Pudding Layers: The pudding can be frozen in an airtight container and thawed in the refrigerator before assembly.
- Frozen Treat Variation: Assemble in popsicle molds with a layer of pudding, cookie crumbs, and a gummy worm, then freeze for a fun, chilled dessert.
Conclusion
“Worms in Dirt” is more than just a dessert; it’s a delightful experience that combines creativity, nostalgia, and flavor. This no-bake treat is perfect for parties, family gatherings, and special occasions, offering endless customization options to suit any theme or dietary need. From its rich pudding base to its playful “dirt” and “worm” toppings, this recipe brings smiles to all who enjoy it.
Whether you stick to the classic version or experiment with fun variations like garden themes, spooky Halloween styles, or healthier options, “Worms in Dirt” remains a timeless favorite. Its simplicity, affordability, and adaptability make it a go-to dessert for both seasoned bakers and beginners alike.
We hope this guide inspires you to get creative and bring your version of “Worms in Dirt” to life. With just a few ingredients and some imaginative presentation, you can create a dessert that’s not only delicious but also a conversation starter. Happy digging!
Final Thoughts
Worms in Dirt is a timeless dessert that invites creativity and fun for all ages. With endless possibilities for customization and presentation, it’s the perfect addition to any event. Dive into your kitchen, gather the ingredients, and let your imagination take over! For more delicious ideas, visit Galactical Recipes and explore our extensive library of culinary inspirations.
Happy digging!
Print
Worms in Dirt
- Total Time: 1 hour 15 minutes
- Yield: 6 servings 1x
- Diet: Vegetarian
Description
A fun and creative no-bake dessert featuring chocolate pudding, crushed cookies, and gummy worms that looks like a miniature garden bed.
Ingredients
- 4 cups Chocolate Pudding (store-bought or homemade)
- 20 Chocolate Sandwich Cookies (Oreo or similar)
- 1–2 cups Gummy Worms
- Optional: Whipped Cream
- Optional: Candy Decorations
- Optional: Food Coloring (green-tinted shredded coconut)
- Optional: Mini terracotta pots, mason jars, or clear plastic cups
Instructions
- Prepare the pudding base according to your choice: use store-bought, make from a mix, or prepare from scratch.
- Chill the pudding in the refrigerator for about 30 minutes to set properly.
- Crush the chocolate sandwich cookies into fine crumbs using a rolling pin or food processor.
- In a serving container, layer the ingredients: start with pudding, followed by crushed cookies, and add gummy worms. Repeat layers.
- Finish with a layer of crushed cookies and decorate with gummy worms and optional toppings.
- Chill the assembled dessert for at least 1 hour before serving.
Notes
Consider making this dessert gluten-free or vegan with specific ingredient swaps. Store in the refrigerator for up to 3 days.
- Prep Time: 15 minutes
- Cook Time: 0 minutes
- Category: Dessert
- Method: No-Bake
- Cuisine: American
Nutrition
- Serving Size: 1 serving
- Calories: 250
- Sugar: 20g
- Sodium: 200mg
- Fat: 10g
- Saturated Fat: 4g
- Unsaturated Fat: 4g
- Trans Fat: 0g
- Carbohydrates: 36g
- Fiber: 2g
- Protein: 3g
- Cholesterol: 5mg
Keywords: Worms in Dirt, dessert, kids dessert, no-bake dessert, fun dessert

