There’s something about spring that brings out the prettiest memories — pastel tablecloths, grandmama humming at the stove, and little hands sneaking just one more candy egg. These No Bake Easter Cheesecakes in a Jar are a tiny, sweet slice of that porch-sitting comfort. They’re simple, gentle, and made for sharing with folks you love.
Why make this recipe
These little jars are perfect for an old-fashioned Easter gathering when you want something pretty without fuss. They’re easy to make ahead, delight the kids, and bring a homemade touch to any dessert table. Plus, they let everyone have their own portion — no fighting over the last slice.
How to make No Bake Easter Cheesecake in a Jar
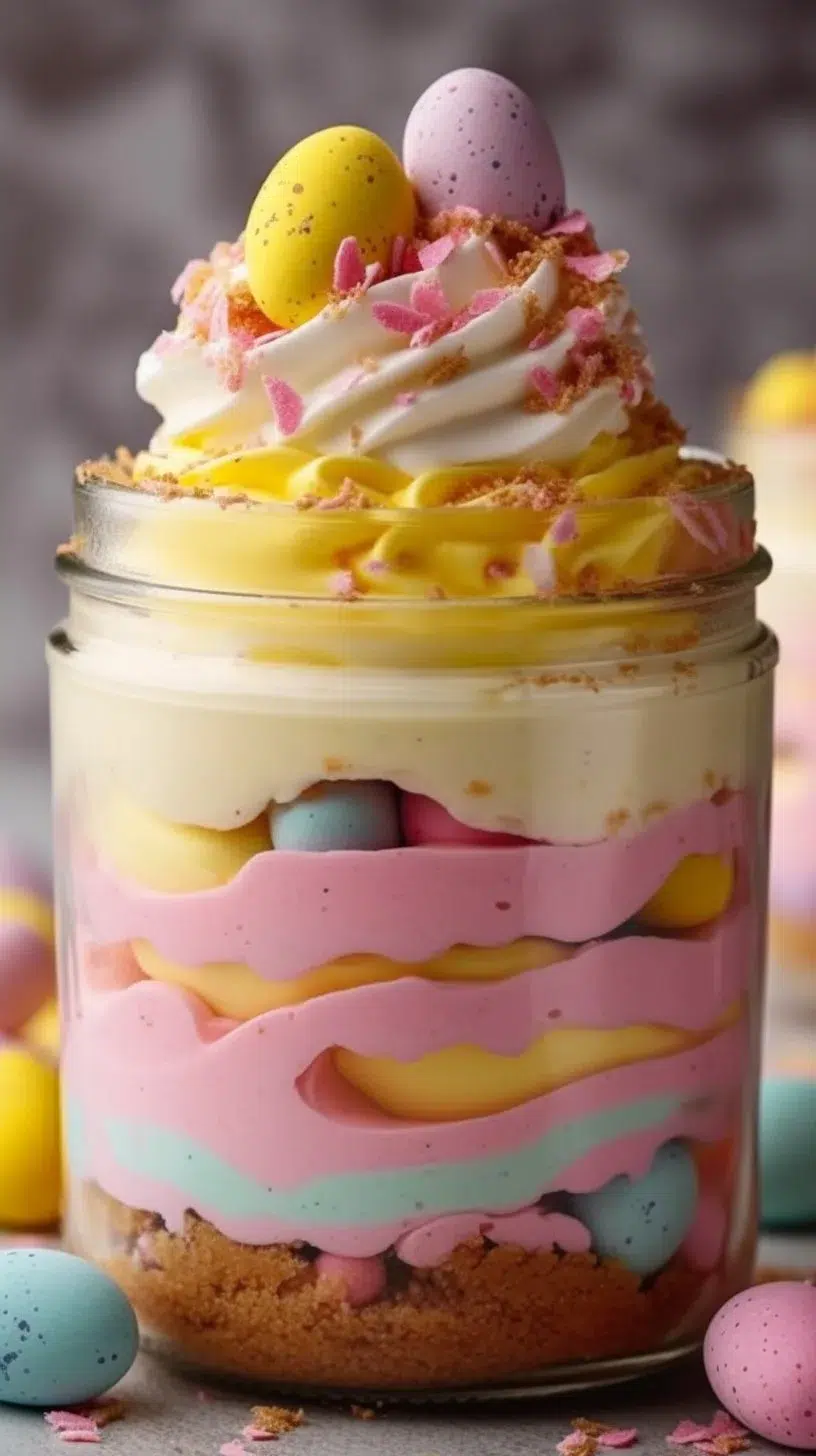
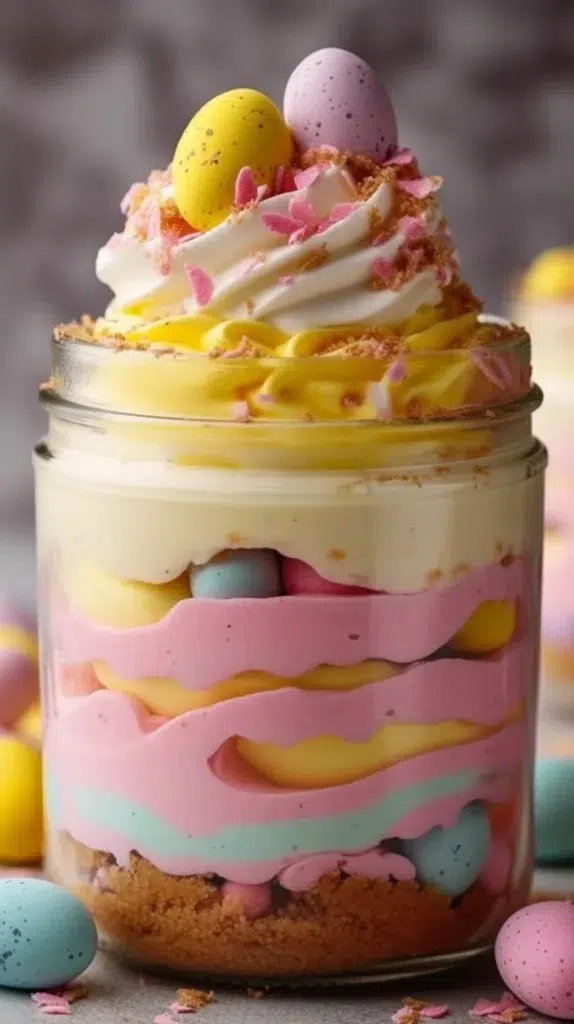
This is the kind of recipe you can make while the kettle hums and someone else is setting the table. We build a buttery graham crust, fold a cloud-like cheesecake filling, tint it in soft pastels, and dress each jar with sprinkles and tiny eggs. It’s buttery, lemony, and as light as a spring morning.
Ingredients:
- 1 1/2 cups graham cracker crumbs
- 1/4 cup granulated sugar
- 6 tablespoons unsalted butter, melted
- 8 ounces cream cheese, softened
- 1/2 cup granulated sugar
- 1 teaspoon vanilla extract
- 1 tablespoon fresh lemon juice
- 1 cup heavy whipping cream
- Pastel food coloring (pink, yellow, blue, or purple)
- 1/2 cup whipped topping (optional for garnish)
- Pastel sprinkles
- Mini chocolate eggs or pastel candies
Directions:
- In a medium bowl, combine graham cracker crumbs, granulated sugar, and melted butter. Stir until the mixture resembles wet sand.
- Spoon 2 to 3 tablespoons of the crust mixture into the bottom of each mason jar or small dessert jar. Press down firmly with the back of a spoon to create an even layer. Refrigerate while preparing the filling.
- In a large bowl, beat the softened cream cheese and granulated sugar until smooth and creamy, about 2 to 3 minutes.
- Add vanilla extract and lemon juice. Mix until fully incorporated.
- In a separate bowl, beat the heavy whipping cream until stiff peaks form.
- Gently fold the whipped cream into the cream cheese mixture until light and fluffy.
- Divide the cheesecake filling into separate bowls if using multiple pastel colors. Add a few drops of food coloring to each and gently mix until evenly tinted.
- Spoon or pipe the colored cheesecake filling over the crust layer in each jar. For a swirled look, alternate colors and lightly swirl with a toothpick.
- Cover and refrigerate for at least 4 hours, or until fully set.
- Before serving, top with whipped topping, pastel sprinkles, and mini chocolate eggs for a festive Easter finish. Chilling overnight provides the best texture and flavor. Keep jars covered and refrigerated for up to 3 days. For extra flavor, add 1 teaspoon lemon zest to the cheesecake filling.
How to serve No Bake Easter Cheesecake in a Jar
Serve these chilled, right from the jar for a little rustic charm. They look darling on a tiered stand or tucked into a basket lined with cloth napkins. Let guests remove the lids at the table — the soft fragrance of lemon and buttery crumbs always brings a smile. Offer little spoons and perhaps a pot of coffee or sweet tea to go with them.
How to store No Bake Easter Cheesecake in a Jar
Keep the jars tightly covered and store them in the refrigerator for up to 3 days. If you’d like to pause and make them a day ahead, they actually get better after a night in the fridge — the flavors marry and the texture firms up nicely. Do not leave them at room temperature for more than two hours.
Tips to make No Bake Easter Cheesecake in a Jar
- Soften the cream cheese well at room temperature for the creamiest filling.
- Press the crust firmly so it holds when you spoon the filling in. A measuring spoon or the bottom of a small glass works great.
- Use gel food coloring for brighter pastels without watering down the filling.
- For a prettier presentation, pipe the filling with a large star tip or use a Ziploc bag with the corner snipped.
- Add 1 teaspoon lemon zest to the filling for a brighter, fresher flavor (and mention it to your guests — it’s a nice surprise).
Variations
- Chocolate graham crust: Replace half the graham crumbs with chocolate cookie crumbs for a cocoa-kissed base.
- Strawberry swirl: Fold in a spoonful of homemade strawberry jam into one of the pastel layers for a fruity ribbon.
- Peanut butter lovers: Mix 2 tablespoons peanut butter into a portion of the filling for a Southern twist.
- Lemon lovers: Increase lemon juice to 2 tablespoons and add the zest for a bolder citrus cheesecake.
FAQs
Q: Can I make these without heavy cream?
A: You can substitute 1 cup of whipped topping, but the texture will be a bit denser and less airy. Heavy cream beaten to stiff peaks gives the lightest, fluffiest result.
Q: Can I freeze these jars?
A: I don’t recommend freezing once they’re assembled; the whipped texture can become grainy. If you must, freeze only the filling in an airtight container (not the jars with crust and toppings) and thaw slowly in the fridge.
Q: How do I prevent the jars from sweating when serving?
A: Keep them refrigerated until just before serving. If your kitchen is warm, set the jars on a small chilled tray or serve straight from a cooler.
Q: Can I make them in larger dishes instead of jars?
A: Absolutely. Use a small springform pan or a pie dish and follow the same layers — just allow a bit more chill time to set.
Conclusion
These No Bake Easter Cheesecakes in a Jar are the kind of little trinkets that bring folks together — pretty as a pastel ribbon and fuss-free as Sunday supper. If you’d like a few more jar-sized inspirations, I found a charming Mini Egg Cheesecake in a Jar recipe and another lovely take on no-bake jars at No-Bake Mini Egg Cheesecakes in a Jar. Pull up a chair, pass the jars around, and remember: it’s the sharing that makes a simple dessert into something treasured.
No Bake Easter Cheesecake in a Jar
Ingredients
Method
- In a medium bowl, combine graham cracker crumbs, granulated sugar, and melted butter. Stir until the mixture resembles wet sand.
- Spoon 2 to 3 tablespoons of the crust mixture into the bottom of each mason jar or small dessert jar. Press down firmly with the back of a spoon to create an even layer. Refrigerate while preparing the filling.
- In a large bowl, beat the softened cream cheese and granulated sugar until smooth and creamy, about 2 to 3 minutes.
- Add vanilla extract and lemon juice. Mix until fully incorporated.
- In a separate bowl, beat the heavy whipping cream until stiff peaks form.
- Gently fold the whipped cream into the cream cheese mixture until light and fluffy.
- Divide the cheesecake filling into separate bowls if using multiple pastel colors. Add a few drops of food coloring to each and gently mix until evenly tinted.
- Spoon or pipe the colored cheesecake filling over the crust layer in each jar. For a swirled look, alternate colors and lightly swirl with a toothpick.
- Cover and refrigerate for at least 4 hours, or until fully set.
- Before serving, top with whipped topping, pastel sprinkles, and mini chocolate eggs for a festive Easter finish. Chilling overnight provides the best texture and flavor.