
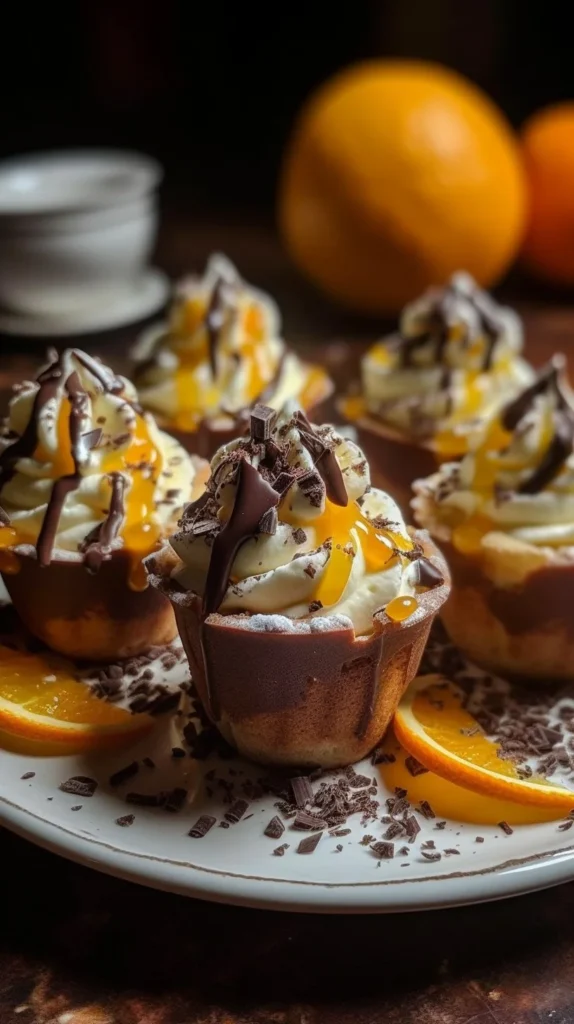
In the quiet embrace of a summer afternoon, a symphony of flavors melds together in delicate harmony. The No Bake Cannoli Cream Dessert Cups invite you to indulge in a sweet serenade, where creamy ricotta and mascarpone dance within crisp pastry cups, conjuring the essence of Italian tradition on your palate. Each bite is a whisper of nostalgia, perfectly balanced with a hint of citrus and the whimsical crunch of chocolate.
Why make this recipe
Crafting these elegant dessert cups is an invitation to revel in the simplicity and beauty of fine ingredients. No baking required, just the gentle embrace of a whisk and a moment of stillness, brings this enchanting dessert to life. Perfect for gatherings or a solitary indulgence, these cups embody both sophistication and playfulness.
How to make No Bake Cannoli Cream Dessert Cups
Ingredients:
- 1 cup ricotta cheese
- 1 cup mascarpone cheese
- 1/2 cup powdered sugar
- 1 teaspoon vanilla extract
- 1/2 teaspoon orange zest
- 1/2 cup mini chocolate chips
- 12 mini phyllo pastry cups
- Extra mini chocolate chips for garnish
- Powdered sugar for dusting
- Fresh mint leaves (optional)
Directions:
In a large mixing bowl, a harmonious blend begins. With an electric mixer humming gently, combine the ricotta cheese and mascarpone cheese, their textures melding into a cream that whispers of luxury. Slowly incorporate the powdered sugar, vanilla extract, and the fragrant orange zest, beating the mixture until it transforms into a velvety dream, smooth and inviting — a meditative process that takes no more than three minutes. With the grace of a painter, gently fold in the mini chocolate chips, ensuring each morsel is lovingly encased in this luscious cream.
The transformation does not end here. With delicate hands, spoon the rich cannoli cream into each mini phyllo pastry cup, allowing the filling to overflow slightly — a promise of sweetness within. Once filled, let these delightful creations rest in the cool sanctuary of your refrigerator for at least an hour. This crucial step allows the flavors to mingle and the cream to set, an invitation for time to weave its magic.
As the moment of anticipation draws near, dust the tops generously with powdered sugar, creating a snowy crown. For an extra touch of whimsy, garnish with additional mini chocolate chips and fresh mint leaves, their vibrant hues a feast for the eyes.
How to serve No Bake Cannoli Cream Dessert Cups
Present these exquisite dessert cups on a porcelain platter, where they can be admired as much as they are devoured. Share them with loved ones at a gathering or savor them solo, each bite a captivating journey through the intricate tapestries of flavor. Pair with a fragrant cup of espresso to elevate the experience, transporting you to an Italian café bathed in sunlight.
How to store No Bake Cannoli Cream Dessert Cups
These delightful treats can be stored in an airtight container in the refrigerator, where they will keep for up to three days. However, the beauty of their creation is most often best embraced within the first day, when the cream retains its lightness and the pastry cups maintain their crispness, a testament to the art of balance.
Tips to make No Bake Cannoli Cream Dessert Cups
- For a more pronounced citrus flavor, consider increasing the orange zest or adding a splash of orange liqueur.
- Use high-quality ingredients, particularly the cheeses, which will greatly enhance the overall taste of the dessert.
- If you’d like an extra layer of crunch, try adding finely chopped pistachios or almonds to the filling.
Variations
- Swap out the chocolate chips for dried fruit, such as raisins or cherries, to create a different flavor profile that harkens back to traditional cannoli.
- For a tropical twist, replace the orange zest with lime zest and incorporate coconut into the filling for a refreshing summer vibe.
FAQs
-
Can I use other types of pastry cups?
Absolutely! While mini phyllo pastry cups provide a lovely crunch, you can also use sugar cookie cups or mini tart shells for a sweeter alternative. -
Is it possible to make this dessert gluten-free?
Yes, simply opt for gluten-free pastry cups available in stores, or craft your own from gluten-free flour. -
How far in advance can I prepare the filling?
The cannoli cream filling can be made a day in advance. Store it in an airtight container in the refrigerator, and spoon it into the pastry cups just before serving for optimal texture.
In the art of baking, patience and love take center stage. As you create these exquisite No Bake Cannoli Cream Dessert Cups, may you find peace in each fold, a rhythm in each whisk, and revel in the simple beauty that emerges from your hands.
No Bake Cannoli Cream Dessert Cups
Ingredients
Method
- In a large mixing bowl, combine the ricotta cheese and mascarpone cheese using an electric mixer until smooth.
- Gradually add the powdered sugar, vanilla extract, and orange zest, beating the mixture until velvety, approximately 3 minutes.
- Fold in the mini chocolate chips gently, ensuring they are well incorporated.
- Spoon the cannoli cream into each mini phyllo pastry cup, allowing the filling to overflow slightly.
- Refrigerate the filled cups for at least 1 hour to allow the flavors to mingle and the cream to set.
- Before serving, dust the tops with powdered sugar and garnish with extra chocolate chips and mint leaves, if desired.