
In a world shimmering with the glow of holiday cheer, the heart invites warmth and delight. A delicate balance of chocolate and the creamy embrace of peanut butter transforms the everyday into ethereal confectionery dreams. These Chocolate Peanut Butter Christmas Trees radiate the spirit of the season, beckoning us to share sweet moments with loved ones.
Why make this recipe
In the flurry of festive preparations, there exists a magic in creating treat-laden memories to cherish for years to come. With each delectable layer, from the velvety peanut butter to the enticing cascade of chocolate, these Christmas trees summon not just taste, but also the essence of joy and togetherness. The act of forming these shapes resonates deeply, offering a comforting ritual during the season of giving.
How to make Chocolate Peanut Butter Christmas Trees
Ingredients:
- 1/2 cup salted butter, melted and cooled
- 2 cups creamy peanut butter
- 1/4 cup granulated sugar
- 1 tablespoon vanilla extract
- 4 cups powdered sugar
- 3 cups semi-sweet chocolate chips or a combination of semi and milk chocolate chips
- 2 tablespoons shortening
- 1/2 cup milk chocolate chips or pieces
- 1/2 cup white chocolate chips or pieces
- 1 teaspoon shortening, divided in half
Directions:
- Begin your journey by lining a jelly roll or half sheet pan with parchment paper, a gentle canvas awaiting its masterpiece.
- With the tender whirr of a hand mixer, combine the melted butter, creamy peanut butter, granulated sugar, and vanilla, until they meld into a silky texture that whispers promises of sweetness. Gradually introduce the powdered sugar, blending until harmoniously mixed.
- Press this luscious peanut butter mixture into the prepared sheet pan, striving for a thickness of about 1/2 inch — a blanket of comfort awaiting transformation.
- Send this creation into the freezer for a brisk yet gentle chill of 15 minutes.
- As you lift the parchment to unearth the chilled peanut butter layer from the pan, replace it with a fresh sheet, nurturing the spirit of craftsmanship.
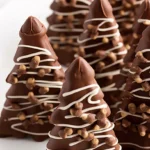
- With the precision of an artist, employ a cookie cutter to carve out 1/2-inch thick Christmas tree shapes, imagining them as ornaments of culinary art.
- Transplant these whimsical cutouts onto a new parchment-lined sheet pan and allow them to rest in the freezer for another 30 minutes, solidifying their form.
- Gather the remnants of your peanut butter mixture, lovingly pressing it back into 1/2 inch thickness for the creation of additional trees.
- After another brief chill of 25 minutes, prepare your chocolate coating as the grand finale awaits.
- In a heatproof bowl, unite the semi-sweet chocolate chips with the shortening, stirring and heating in 30-second increments in the microwave until transformed into a velvety river of chocolate.
- With a gentle hand, use a fork to lift each peanut butter cutout, drenching them in the melted chocolate. Tap lightly to release the excess, placing each one delicately back onto the cookie sheet, like pieces of art laid to rest.
- Work with focus and grace, ensuring the warmth of the peanut butter does not soften your masterpieces too swiftly.
- Allow the chocolate to harden, a transformative pause in this sweet performance.
- For an optional flourish, repeat the melting ritual with the milk chocolate or white chocolate chips and the remaining shortening, painting your trees with zigzag drizzles that invite the eye to savor their beauty. Allow this final touch to set, capturing the fleeting magic of the season.
How to serve Chocolate Peanut Butter Christmas Trees
These enchanting trees stand tall upon a place of honor on your holiday table, welcoming eager guests to partake in their joy. They pair beautifully with a cup of mulled cider or a rich espresso, inviting conversation and laughter.
How to store Chocolate Peanut Butter Christmas Trees
Nestle these delightful treats in an airtight container at room temperature for up to a week, allowing the aroma of chocolate and peanut butter to envelop your kitchen. If you seek longevity, they may be stored in the freezer for up to a month; a delightful surprise when the craving for festive comfort returns.
Tips to make Chocolate Peanut Butter Christmas Trees
- Ensure your butter is slightly cooled enough before mixing, creating a creamy consistency that binds beautifully.
- When drizzling, practice patience — intricate designs enhance the artful finish and reflect the love poured into creation.
- Experiment with additions, like crushed candy canes or edible glitter, for a whimsical twist that glimmers in holiday light.
Variations
Consider the inclusion of flavors — a touch of sea salt can elevate the peanut butter’s allure, while a blend of chocolates may create a delightful tapestry of taste.
FAQs
-
Can I use a different type of nut butter?
Yes, feel free to substitute with almond or cashew butter for a unique twist, keeping in mind the flavor harmonies that will emerge. -
Is it necessary to chill the peanut butter layer?
Yes, chilling is essential to firm up the mixture, allowing you to cut out clean shapes that will hold their form beautifully. -
How can I prevent the chocolate from hardening too quickly?
Working in small batches with the melted chocolate will allow you ample time to coat each cutout gracefully without rushing.
In the end, creating these Chocolate Peanut Butter Christmas Trees is a quiet journey of intention, where each step invites a moment of reflection and gratitude, echoing the beauty of patience found in the art of baking.
Chocolate Peanut Butter Christmas Trees
Ingredients
Method
- Line a jelly roll or half sheet pan with parchment paper.
- In a bowl, mix melted butter, peanut butter, granulated sugar, and vanilla until smooth.
- Gradually add powdered sugar and mix until well combined.
- Press the peanut butter mixture into the prepared sheet pan to about 1/2 inch thick.
- Freeze for 15 minutes.
- Cut out Christmas tree shapes using a cookie cutter and place them back in the freezer for another 30 minutes.
- Re-use the remaining mixture to make additional trees.
- Melt semi-sweet chocolate chips with shortening in a heatproof bowl, heating in 30-second increments.
- Use a fork to dip each peanut butter cutout into the melted chocolate, allowing excess to drip off.
- Place coated trees back onto the cookie sheet to firm up.
- For optional flair, melt milk and white chocolate separately and drizzle over the coated trees.