Few desserts can rival the indulgent delight of a cherry cheesecake recipe. With its velvety-smooth cream cheese filling, buttery graham cracker crust, and vibrant cherry topping, this classic treat is a showstopper for any occasion. Whether you’re a seasoned baker or a novice in the kitchen, this comprehensive guide will walk you through everything you need to know to create a flawless cherry cheesecake.
In this article, you’ll discover:
- The essential ingredients and their role in achieving the perfect texture and flavor.
- A step-by-step guide to making both baked and no-bake versions.
- Creative variations and flavor twists to customize your cheesecake.
- Common mistakes to avoid and expert tips for a smooth, crack-free finish.
- Presentation, serving ideas, and frequently asked questions.
Let’s dive into the history and allure of this beloved dessert!
Introduction to Cherry Cheesecake
The Allure of Cherry Cheesecake
There’s something undeniably irresistible about a rich, creamy cheesecake topped with glossy, ruby-red cherries. The contrast between the tangy cream cheese filling and the sweet-tart cherry topping creates an exquisite balance of flavors, making it a dessert staple across generations. Whether served at holiday gatherings, birthdays, or casual family dinners, cherry cheesecake is always a crowd favorite.
Historical Background of Cheesecake
Did you know that cheesecake dates back to ancient Greece? Historians trace its origins to the 5th century BCE, where Greek athletes consumed a simple version made from honey and cheese. Later, the Romans spread the recipe across Europe, where it evolved into various regional styles.
Fast forward to the 20th century, when the invention of cream cheese revolutionized cheesecake recipes. The smooth, creamy texture we know today became possible, giving birth to the New York-style cheesecake. Adding fruit toppings, like cherries, soon became a tradition, further elevating the dessert’s appeal.
Why Cherry Topping Became a Classic Choice
The marriage of cherries and cheesecake isn’t just about aesthetics—it’s a perfect flavor pairing. Cherries add natural acidity, balancing the richness of the cream cheese. Their vibrant color and glossy appearance also make the dessert visually stunning. Over time, cherry cheesecake became a go-to dessert for both special occasions and everyday indulgence.
Stay tuned for Part 2, where we’ll dive into the essential ingredients that make a cherry cheesecake truly exceptional! 🍒
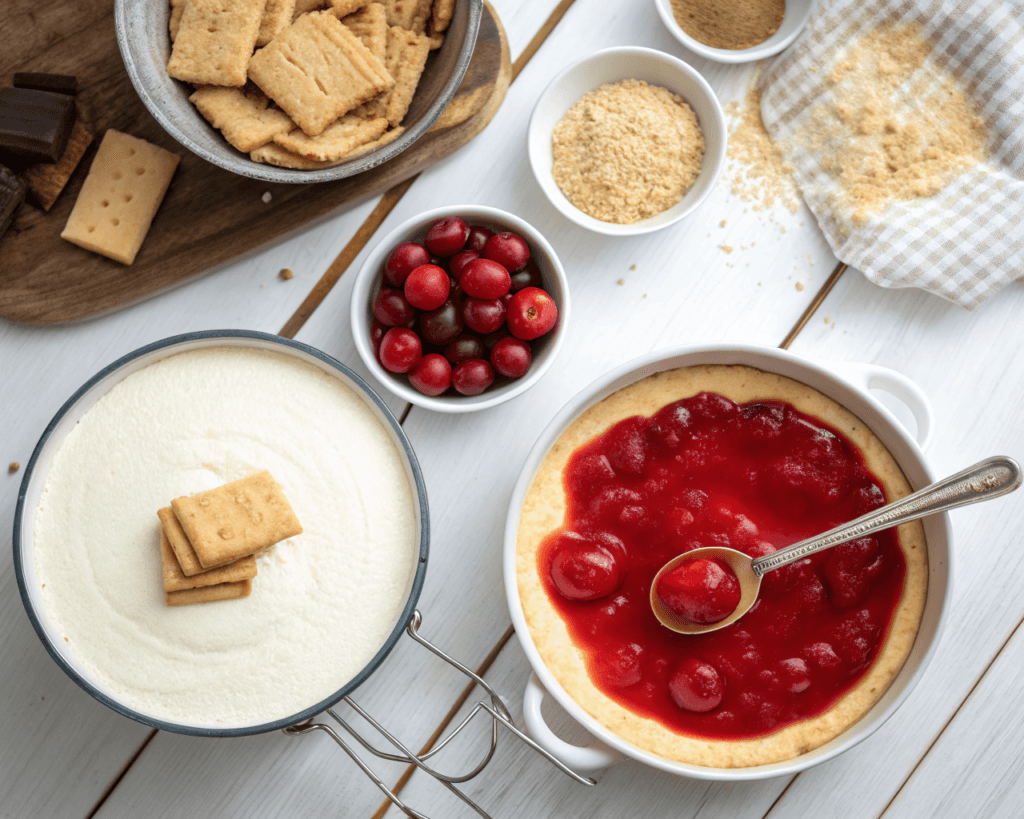
Essential Ingredients for a Delicious Cherry Cheesecake
Creating the perfect cherry cheesecake recipe hinges on selecting the finest ingredients. Each component plays a pivotal role in achieving that coveted balance of flavor and texture.
Choosing the Right Cream Cheese
The foundation of any great cheesecake is its cream cheese. Opt for full-fat cream cheese to ensure a rich and creamy consistency. Brands like Philadelphia are renowned for their quality and have been trusted by bakers for generations. Remember, using low-fat alternatives can result in a less satisfying texture.
Selecting the Perfect Crust Base
Traditionally, a graham cracker crust complements the tangy cheesecake filling beautifully. To make this:
- Ingredients: Graham crackers, unsalted butter, and a touch of sugar.
- Instructions: Crush the graham crackers into fine crumbs, mix with melted butter and sugar until it resembles wet sand, then press firmly into the bottom of your springform pan.
For those seeking a twist, consider using digestive biscuits or even chocolate cookies as a base.
Fresh vs. Canned Cherries: What to Use
When it comes to the cherry topping, both fresh and canned cherries have their merits:
- Fresh Cherries: Offer a natural sweetness and firm texture. Ideal when they’re in season. Simply pit and cook them down with a bit of sugar and lemon juice to create a compote.
- Canned Cherries: Convenient and available year-round. Opt for high-quality canned cherries in light syrup to avoid excessive sweetness.
Sweeteners and Flavor Enhancements
To elevate your cheesecake:
- Sweeteners: Granulated sugar is standard, but for a deeper flavor, consider brown sugar or even honey.
- Flavorings: A splash of pure vanilla extract enhances the cream cheese’s flavor. A teaspoon of lemon zest can also add a refreshing citrus note.
By thoughtfully selecting and balancing these ingredients, you’ll lay the groundwork for a cherry cheesecake that’s both indulgent and memorable.
Step-by-Step Guide to Making Cherry Cheesecake
Embarking on the journey of crafting a cherry cheesecake recipe can be both enjoyable and rewarding. Follow these detailed steps to ensure a delectable outcome.
Preparing the Graham Cracker Crust
- Gather Ingredients:
- 1½ cups graham cracker crumbs
- ¼ cup granulated sugar
- ½ cup unsalted butter, melted
- Mix: In a medium bowl, combine the graham cracker crumbs and sugar. Pour in the melted butter and stir until the mixture resembles wet sand.
- Press: Transfer the mixture into a 9-inch springform pan. Using the back of a spoon or the bottom of a glass, press the crumbs firmly and evenly across the bottom and slightly up the sides.
- Bake (Optional): Preheat your oven to 350°F (175°C). Bake the crust for 8-10 minutes to set it and enhance its flavor. Allow it to cool while preparing the filling.
Crafting the Creamy Cheesecake Filling
- Gather Ingredients:
- 32 ounces (4 packages) full-fat cream cheese, softened
- 1 cup granulated sugar
- 1 teaspoon pure vanilla extract
- 4 large eggs
- 1 cup sour cream
- 2 tablespoons all-purpose flour (optional, for added structure)
- Beat Cream Cheese: In a large mixing bowl, beat the softened cream cheese on medium speed until smooth and creamy, about 2 minutes.
- Add Sugar and Vanilla: Gradually add the sugar and vanilla extract, continuing to beat until well combined.
- Incorporate Eggs: Add the eggs one at a time, beating on low speed after each addition until just combined. Overbeating can introduce air bubbles, which may cause cracking.
- Blend in Sour Cream and Flour: Gently mix in the sour cream and flour until the batter is smooth.
Baking Techniques for a Perfect Texture
- Prepare the Pan: Before pouring the batter, ensure the crust has cooled. Wrap the bottom of the springform pan with aluminum foil to prevent water from seeping in during baking.
- Pour Batter: Pour the cheesecake batter over the cooled crust, smoothing the top with a spatula.
- Water Bath: Place the springform pan into a larger roasting pan. Fill the roasting pan with hot water until it reaches halfway up the sides of the springform pan. This water bath (bain-marie) helps maintain a consistent temperature and prevents cracking.
- Bake: Preheat your oven to 325°F (163°C). Bake the cheesecake for 1 hour and 15 minutes, or until the center is set but still slightly jiggly.
- Cool Gradually: Turn off the oven, crack the door open, and let the cheesecake cool inside for 1 hour. This gradual cooling helps prevent cracks.
- Refrigerate: Remove the cheesecake from the water bath, run a knife around the edge to loosen it, and refrigerate for at least 4 hours, preferably overnight.
Creating the Cherry Topping
- Gather Ingredients:
- 2 cups fresh or canned cherries (pitted)
- ½ cup granulated sugar
- 2 tablespoons lemon juice
- 1 tablespoon cornstarch mixed with 2 tablespoons water (for thickening)
- Cook: In a saucepan over medium heat, combine the cherries, sugar, and lemon juice. Stir occasionally until the mixture begins to simmer.
- Thicken: Add the cornstarch slurry to the saucepan. Continue to cook, stirring constantly, until the sauce thickens, about 2-3 minutes.
- Cool: Remove from heat and let the cherry topping cool to room temperature.
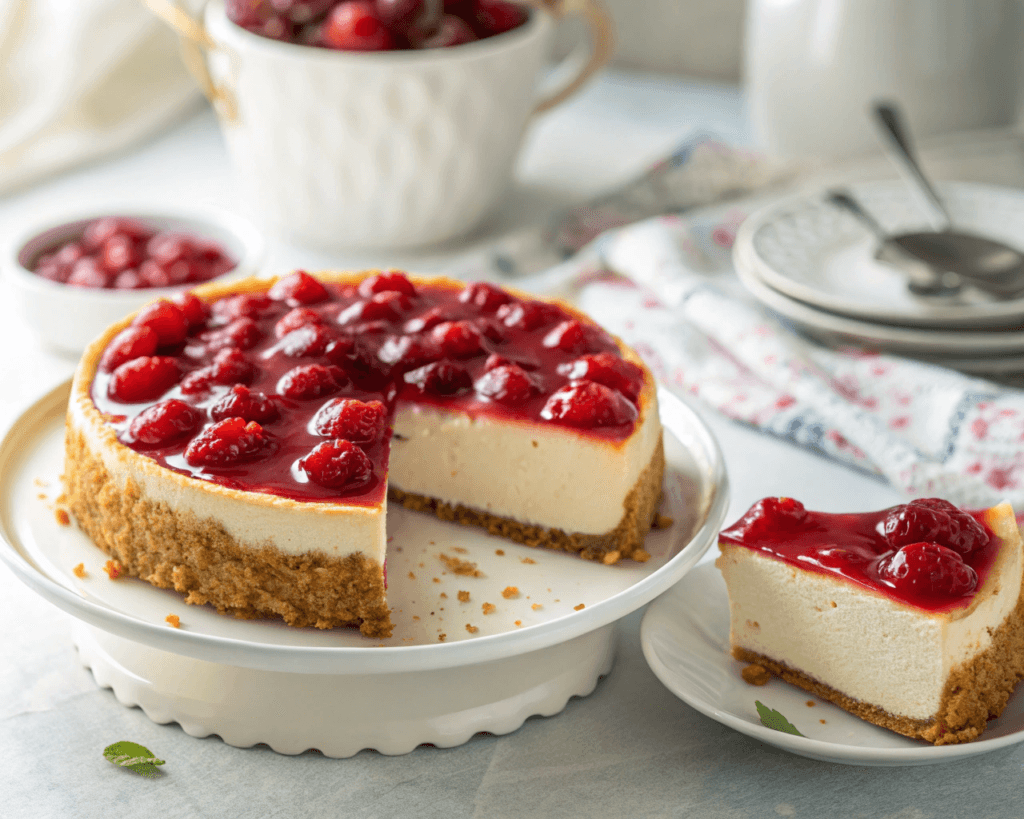
Assembling and Chilling the Cheesecake
- Top the Cheesecake: Once the cheesecake has fully set and cooled, pour the cherry topping over the surface, spreading it evenly.
- Chill: Return the cheesecake to the refrigerator for an additional hour to allow the topping to set.
- Serve: When ready to serve, carefully remove the sides of the springform pan. Slice with a sharp knife, wiping it clean between cuts for neat slices.
By meticulously following these steps, you’ll master the art of the cherry cheesecake recipe, delighting both yourself and your guests with a dessert that’s as stunning as it is scrumptious.
Variations and Creative Twists on the Classic Cherry Cheesecake Recipe
While the traditional cherry cheesecake recipe is undeniably delightful, exploring creative variations can add an exciting twist to this classic dessert. Let’s delve into some innovative approaches that will tantalize your taste buds.
No-Bake Cherry Cheesecake Options
Craving cheesecake but short on time? A no-bake version is your answer. This method skips the oven, resulting in a lighter texture that’s perfect for warmer months.
- Prepare the Crust: Combine graham cracker crumbs with melted butter and press into a springform pan. Chill in the refrigerator to set.
- Make the Filling: Beat softened cream cheese with powdered sugar and vanilla extract until smooth. Fold in whipped cream or whipped topping to achieve a fluffy consistency.
- Assemble: Pour the filling over the chilled crust and smooth the top. Refrigerate for at least 4 hours, or until firm.
- Top with Cherries: Before serving, spread a generous layer of cherry topping over the cheesecake.
This no-bake method offers a quick and easy alternative without compromising on flavor.
Incorporating Chocolate or Nutty Flavors
Elevate your cherry cheesecake by introducing chocolate or nuts, adding depth and complexity to each bite.
- Chocolate Swirl: Melt semi-sweet chocolate and swirl it into the cheesecake batter before baking. The rich chocolate complements the tart cherries beautifully.
- Nutty Crust: Substitute part of the graham cracker crumbs with finely chopped nuts, such as almonds or pecans, to add a delightful crunch and nutty flavor to the crust.
These additions provide a delectable contrast to the creamy filling and sweet cherry topping.
Exploring Alternative Crusts
While graham cracker crusts are traditional, experimenting with different bases can offer unique flavor profiles.
- Oreo Cookie Crust: Crush chocolate sandwich cookies and mix with melted butter for a rich, chocolatey base that pairs wonderfully with cherries.
- Ginger Snap Crust: Use crushed ginger snap cookies to add a spicy kick, enhancing the overall flavor complexity of the cheesecake.
These alternative crusts can transform the classic cherry cheesecake recipe into a novel dessert experience.
Using Different Fruit Toppings
If you’re looking to diversify beyond cherries, consider these fruit topping alternatives:
- Mixed Berries: A combination of blueberries, raspberries, and strawberries provides a burst of color and flavor.
- Peach Compote: Sweet, caramelized peaches offer a summery twist that’s both refreshing and indulgent.
By experimenting with various fruit toppings, you can customize the cheesecake to suit seasonal ingredients or personal preferences.
Common Mistakes to Avoid When Making Cherry Cheesecake
Even seasoned bakers can encounter pitfalls when crafting a cherry cheesecake. Being aware of common mistakes can help ensure a flawless dessert.
Preventing Cracked Surfaces
A cracked cheesecake can be disappointing, but it’s often avoidable:
- Overmixing: Incorporating too much air into the batter can cause cracks. Mix on low speed and stop once ingredients are just combined.
- Rapid Temperature Changes: Sudden shifts can lead to cracking. After baking, allow the cheesecake to cool gradually in the oven with the door slightly ajar before bringing it to room temperature.
Avoiding a Soggy Crust
A soggy crust can undermine the entire dessert:
- Proper Pre-Baking: Even if the recipe doesn’t call for it, pre-baking the crust for about 10 minutes helps it set and stay crisp.
- Water Bath Precautions: When using a water bath, ensure the springform pan is securely wrapped in multiple layers of foil to prevent water from seeping in.
Ensuring the Filling Sets Properly
Achieving the ideal creamy yet firm texture requires attention:
- Accurate Baking Time: Overbaking can make the cheesecake dry, while underbaking leaves it too soft. The center should still have a slight jiggle when you turn off the oven.
- Ingredient Temperatures: Use room temperature ingredients to ensure a smooth batter and even baking.
Tips for Achieving the Right Sweetness Balance
Balancing sweetness is crucial for a harmonious flavor profile:
- Taste the Batter: Before baking, taste the batter to adjust sweetness levels. Remember, the cherry topping will add additional sweetness.
- Quality of Cherries: If using canned cherries, opt for those in light syrup to avoid an overly sweet topping.
By being mindful of these common pitfalls, you can perfect your cherry cheesecake recipe and impress your guests with a dessert that’s as beautiful as it is delicious.
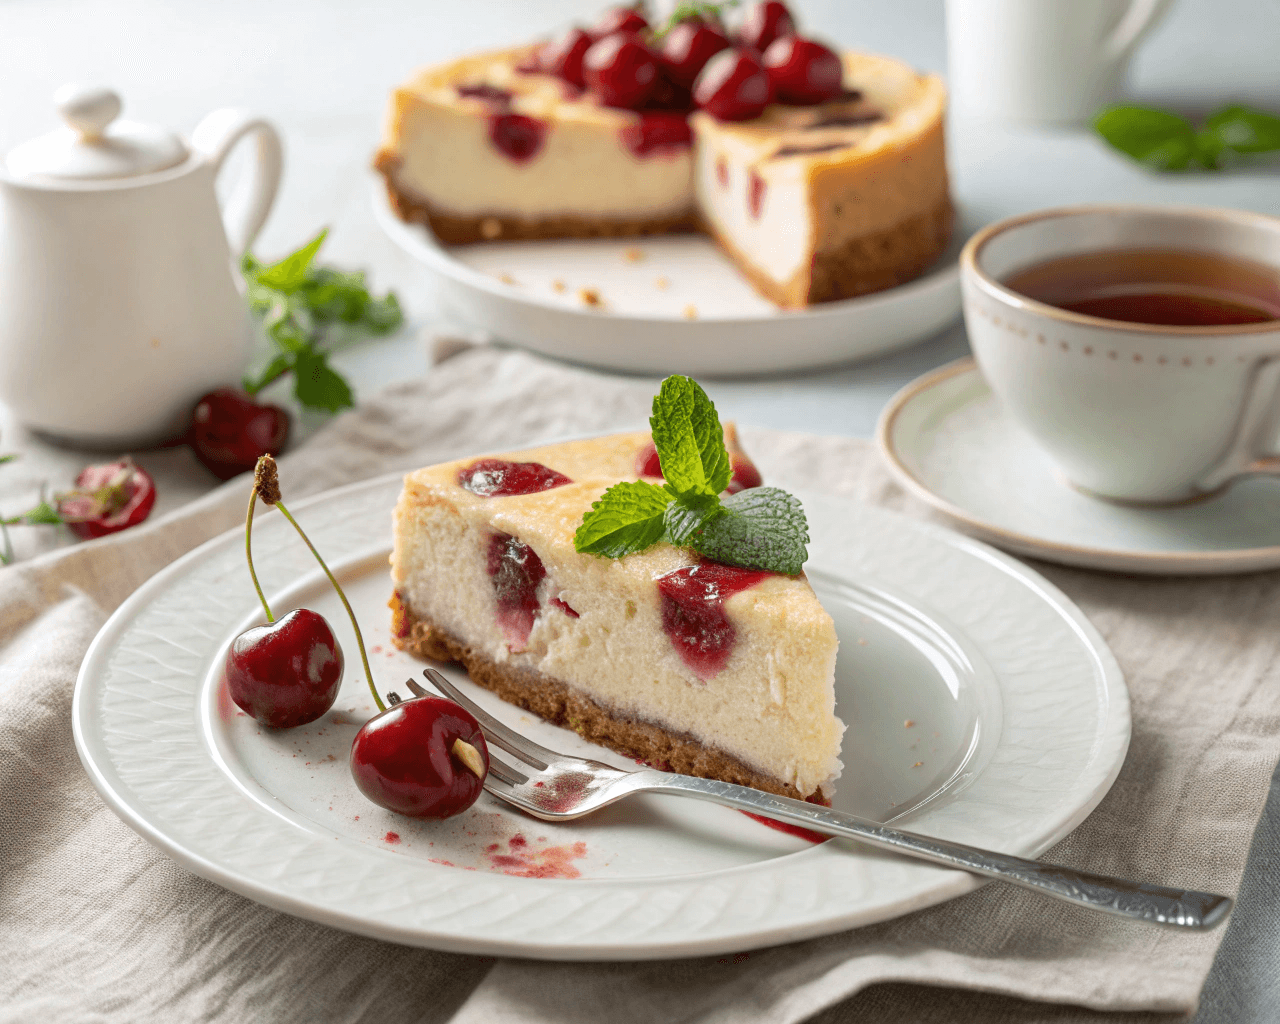
Serving and Presentation Tips for Cherry Cheesecake
Creating a stunning cherry cheesecake recipe isn’t just about taste—it’s also about presentation. A beautifully plated cheesecake can make any occasion feel special. Here are some tips to make your cheesecake as visually appealing as it is delicious.
Garnishing Ideas to Enhance Appearance
Adding the right garnishes can elevate your cheesecake’s look and add layers of flavor:
- Fresh Cherries: A few whole cherries on top add a fresh, vibrant touch.
- Chocolate Shavings: A sprinkle of finely grated chocolate can enhance the richness of your cheesecake.
- Whipped Cream Swirls: Pipe small dollops of whipped cream around the edges for an elegant finish.
- Mint Leaves: A fresh sprig of mint provides a pop of color and a refreshing aroma.
Optimal Serving Temperatures
Cheesecake is best served chilled, but the right temperature can enhance its texture and taste:
- Refrigerated: Serve straight from the fridge for a firm, dense texture.
- Slightly Softened: Let it sit at room temperature for 15 minutes before serving to achieve a silkier consistency.
Pairing Suggestions: Beverages and Sides
Pairing your cheesecake with the right drink or accompaniment can make the experience even better:
- Beverages: Try it with freshly brewed coffee, a cup of black tea, or a glass of cold milk.
- Sides: Serve alongside a scoop of vanilla ice cream or a handful of mixed berries for a contrast in flavors.
Storing Leftovers to Maintain Freshness
To keep your cherry cheesecake fresh:
- Refrigeration: Store in an airtight container for up to 5 days.
- Freezing: Wrap slices tightly in plastic wrap and freeze for up to 2 months. Thaw in the fridge overnight before serving.
By following these serving and storage tips, you can enjoy your cheesecake at its best, whether freshly made or saved for later.
Frequently Asked Questions About Cherry Cheesecake
When making a cherry cheesecake recipe, a few common questions often arise. Here are answers to help ensure success.
Can I use frozen cherries instead of fresh ones?
Yes! Frozen cherries work well, especially when fresh cherries aren’t in season. Simply thaw and drain them before making the topping to prevent excess moisture.
How long can cherry cheesecake be stored in the refrigerator?
Properly stored in an airtight container, cheesecake stays fresh for up to 5 days. If you want to keep it longer, freezing is a great option.
Is it possible to make a gluten-free version of cherry cheesecake?
Absolutely! Replace the graham cracker crust with gluten-free cookies or almond flour mixed with butter. The filling remains naturally gluten-free.
What causes cracks in the cheesecake, and how can I prevent them?
Cracks often result from overbaking, rapid cooling, or too much air in the batter. Use a water bath, avoid overmixing, and cool the cheesecake gradually for a smooth, crack-free finish.
By keeping these tips in mind, you can confidently master any cherry cheesecake recipe and impress your family and friends with a flawless dessert! 🍒
Pro Tips for a Perfect Cherry Cheesecake Recipe
Even the best bakers can refine their skills with a few expert tricks. These pro tips will help you master the cherry cheesecake recipe every time.
Using Room Temperature Ingredients for a Smooth Batter
Cold ingredients don’t mix well and can create a lumpy batter. For the best texture:
- Cream cheese: Let it soften at room temperature for about 30 minutes before mixing.
- Eggs and sour cream: Take them out of the fridge 15-20 minutes before use to ensure smooth blending.
Water Bath Method for Even Baking
A water bath (bain-marie) creates gentle heat that prevents cracking and overbaking:
- Wrap the springform pan tightly in aluminum foil to prevent leaks.
- Place it inside a large roasting pan.
- Pour hot water into the roasting pan until it reaches halfway up the sides of the cheesecake pan.
- Bake as directed, then cool gradually to prevent sudden temperature changes.
How to Slice Cheesecake Like a Pro
To get perfect, clean slices:
- Use a sharp knife, preferably a chef’s knife.
- Dip the knife in hot water and wipe it clean between each cut.
- Slice in a gentle, downward motion instead of dragging through the cheesecake.
These small but impactful techniques will help you bake and serve a stunning cheesecake that’s just as delicious as it looks.
Final Thoughts on Making the Best Cherry Cheesecake Recipe
A cherry cheesecake recipe is more than just a dessert—it’s an experience. From the buttery graham cracker crust to the creamy filling and vibrant cherry topping, every bite offers a perfect balance of flavors and textures.
By using high-quality ingredients, following baking techniques like a water bath, and experimenting with creative variations, you can personalize this classic treat to suit any occasion. Whether you choose a no-bake version, a chocolate-infused twist, or a gluten-free alternative, the possibilities are endless.
Remember, patience is key when making cheesecake. Allow it to cool slowly, refrigerate for several hours, and use a careful slicing method for the best presentation. These extra steps make all the difference in achieving a smooth, rich, and indulgent cheesecake.
Now that you’ve mastered the essentials, it’s time to put your skills to the test! Grab your ingredients, follow the steps, and enjoy the satisfaction of making the perfect cherry cheesecake. Happy baking! 🍒🎂
Print
The Ultimate Guide to Crafting the Perfect Cherry Cheesecake
- Total Time: 6 hours (including cooling & chilling)
- Yield: 10–12 servings 1x
- Diet: Vegetarian
Description
This cherry cheesecake recipe delivers a rich, creamy dessert with a buttery graham cracker crust and a vibrant cherry topping. Perfect for any occasion, this easy-to-follow guide ensures a smooth, indulgent cheesecake every time!
Ingredients
For the Crust:
1 ½ cups graham cracker crumbs
¼ cup granulated sugar
½ cup unsalted butter, melted
For the Cheesecake Filling:
32 oz (4 packages) full-fat cream cheese, softened
1 cup granulated sugar
1 teaspoon pure vanilla extract
4 large eggs
1 cup sour cream
2 tablespoons all-purpose flour (optional, for structure)
For the Cherry Topping:
2 cups fresh or canned cherries (pitted)
½ cup granulated sugar
2 tablespoons lemon juice
1 tablespoon cornstarch mixed with 2 tablespoons water
Instructions
1 Preheat the oven to 350°F (175°C).
2 In a medium bowl, mix graham cracker crumbs, sugar, and melted butter until combined.
3 Press the mixture firmly into a 9-inch springform pan and slightly up the sides.
4 Bake for 8-10 minutes, then let it cool while preparing the filling.
1 In a large bowl, beat softened cream cheese on medium speed until smooth.
2 Add sugar and vanilla extract, mixing until fully incorporated.
3 One at a time, add the eggs, beating on low speed to avoid overmixing.
4 Gently fold in sour cream and flour until smooth and creamy.
1 Pour the cheesecake batter over the cooled crust.
2 Wrap the springform pan with aluminum foil and place it in a water bath (a roasting pan filled with hot water up to halfway).
3 Bake at 325°F (163°C) for 1 hour 15 minutes, or until the center is set but slightly jiggly.
4 Turn off the oven, crack the door open, and let the cheesecake cool inside for 1 hour to prevent cracks.
1 In a saucepan over medium heat, combine cherries, sugar, and lemon juice.
2 Stir occasionally until the mixture begins to simmer.
3 Add the cornstarch slurry and continue cooking until thickened (about 2-3 minutes).
4 Remove from heat and allow to cool.
1 Once the cheesecake is fully cooled, spread the cherry topping evenly over the top.
2 Refrigerate for at least 4 hours, preferably overnight, for the best texture.
1 Carefully remove the sides of the springform pan.
2 Slice with a sharp, warm knife, wiping clean between cuts.
3 Serve chilled and enjoy this decadent cherry cheesecake recipe! 🍒
- Prep Time: 20 minutes
- Cook Time: 1 hour 15 minutes
- Category: Dessert
- Method: Baking
- Cuisine: American
Nutrition
- Calories: 420 kcal
- Sugar: 31g
- Fat: 26g
- Saturated Fat: 15g
- Carbohydrates: 42g
- Fiber: 1g
- Protein: 6g
Keywords: Cherry cheesecake recipe, classic cherry cheesecake, homemade cheesecake, baked cheesecake, creamy cheesecake, best cheesecake recipe